keyword :
Wemose D1 Mini DS3231, RTC DS3231 Wemos D1 mini, ESP8266 DS3231, I2C ESP8266 Wemos D1 Mini.

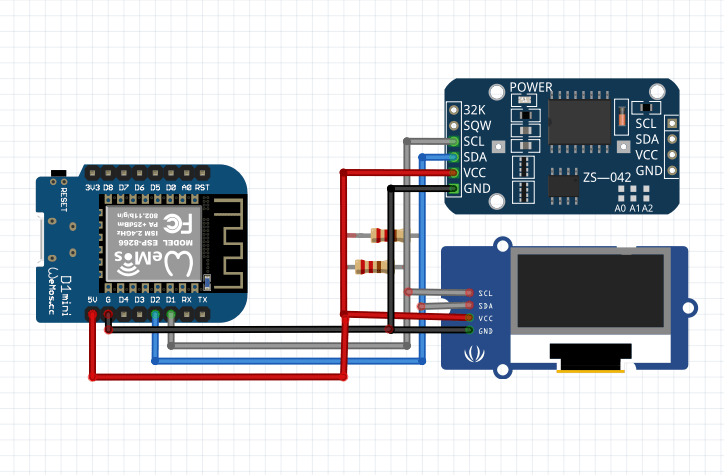
pertama silahkan rangkai dulu senjatanya seperti gambar di atas, adapun library yang diperlukan bisa di download disini
Baca Juga : Project Arduino Membuat Rangkaian Arduino dengan Breadboard pada Fritzing yuk Sahabat Indobot
setelah itu silahkan buat pogram berikut ini :
#include
#include
#include
#include
#define OLED_RESET 0
Adafruit_SSD1306 display(OLED_RESET);
#define NUMFLAKES 10
#define XPOS 0
#define YPOS 1
#define DELTAY 2
#define LOGO16_GLCD_HEIGHT 16
#define LOGO16_GLCD_WIDTH 16
#include
#include “RTClib.h”
RTC_DS3231 rtc;
#define detik now.second()
#define menit now.minute()
#define jam now.hour()
#define tangal now.day()
#define hari daysOfTheWeek[now.dayOfTheWeek()]
#define bulan now.month()
#define tahun now.year()
char daysOfTheWeek[7][12] = {“Minggu”, “Senin”, “Selasa”, “Rabu”, “Kamis”, “Jum’at”, “Saturday”};
char buff[10];
#if (SSD1306_LCDHEIGHT != 64)
//#error(“Height incorrect, please fix Adafruit_SSD1306.h!”);
#endif
void setup() {
// put your setup code here, to run once:
Serial.begin(115200);
display.begin(SSD1306_SWITCHCAPVCC, 0x3C);
if (! rtc.begin()) {
Serial.println(“Couldn’t find RTC”);
while (1);
}
if (rtc.lostPower()) {
Serial.println(“RTC lost power, lets set the time!”);
// following line sets the RTC to the date & time this sketch was compiled
rtc.adjust(DateTime(F(__DATE__), F(__TIME__)));
// This line sets the RTC with an explicit date & time, for example to set
// January 21, 2014 at 3am you would call:
// rtc.adjust(DateTime(2014, 1, 21, 3, 0, 0));
}
}
void loop() {
// put your main code here, to run repeatedly:
DateTime now = rtc.now();
if (jam <10 && menit <10){
sprintf (buff, “%s 0%d:0%d”, hari,jam,menit);
}
else if (jam <10 && menit >= 10){
sprintf (buff, “%s 0%d:%d”, hari,jam,menit);
}
else if (jam >=10 && menit <10){
sprintf (buff, “%s %d:0%d”, hari,jam,menit);
}
else if (jam >=10 && menit >=10){
sprintf (buff, “%s %d:%d”, hari,jam,menit);
}
display.clearDisplay();
display.setTextSize(1);
display.setTextColor(WHITE);
display.setCursor(0,0);
display.println(buff);
display.display();
delay(2000);
}
mungkin cukup sekian artikel kali ini semoga bermanfaat dan jangan lupa untuk berkomentar di bawah ini
Source : https://www.anakkendali.com/2018/08/esp8266-cara-mengakses-rtc-ds3231-dan.html
Kamu pemula dan ingin belajar/bikin project elektronika dari nol? Ikuti program dari Indobot!


Warning: Undefined variable $req in /www/wwwroot/blog.indobot.co.id/wp-content/themes/generatepress/functions.php on line 162
Warning: Undefined variable $commenter in /www/wwwroot/blog.indobot.co.id/wp-content/themes/generatepress/functions.php on line 163
Warning: Trying to access array offset on value of type null in /www/wwwroot/blog.indobot.co.id/wp-content/themes/generatepress/functions.php on line 163
Warning: Undefined variable $aria_req in /www/wwwroot/blog.indobot.co.id/wp-content/themes/generatepress/functions.php on line 163
Warning: Undefined variable $req in /www/wwwroot/blog.indobot.co.id/wp-content/themes/generatepress/functions.php on line 167
Warning: Undefined variable $commenter in /www/wwwroot/blog.indobot.co.id/wp-content/themes/generatepress/functions.php on line 168
Warning: Trying to access array offset on value of type null in /www/wwwroot/blog.indobot.co.id/wp-content/themes/generatepress/functions.php on line 168
Warning: Undefined variable $aria_req in /www/wwwroot/blog.indobot.co.id/wp-content/themes/generatepress/functions.php on line 169